I love landscape photography, be they natural or urban scenic views. In fact, I love this form of photography so much that whenever I travel to a foreign place, I always end up more such shots than any with myself in them.
It is not difficult to understand why I love it so much. It requires minimal technical knowledge, is easy to understand, learn and execute, and gives me huge satisfaction whenever I manage to capture a really beautiful and wallpaper worthy landscape photo.
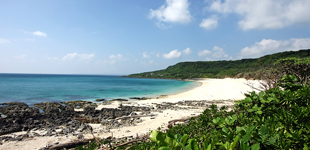
Here are some tips on what to look out for if you want to give landscapes a go.
Use a tripod
Tripod may seem cumbersome when you are traveling, but you will be rewarded with non-blurry photos. It is very tough to hold your camera completely still even when shooting at 1/30th of a second.
With a tripod, not only you can shoot a landscape photo with yourself in it but you can also shoot with shutter speed up to 30 seconds long and still get a sharp photo.
Straightening your photoAlways use the timer function or a shutter cable release so that you can take a picture without touching the camera.
A horizontally straight photo is the key to a good landscape photo. It can be achieved by aligning your photos parallel to the horizon’s horizontal line. You can also opt for a small spirit bubble level, which is a tiny and cube-liked accessory, that will cost you between RM20 to RM30. Leave the artistic 45 degree or crooked photos for other subjects.
Rule of third
Avoid composing your shot where the sky and land are of equal space in your photo. There should always be a dominant subject, taking up two thirds of your photo to present a better balanced landscape photo.
If the sky is filled with interesting cloud formations or has a beautiful colour tone (like a deep blue sky, for example), fill your frame with more of it than land. Viewers will immediately know which subject or foreground to focus on when they view your photo.
The same rule applies to human elements or interesting objects in your landscape photo. Position them 1/3 to the left or right but not in the middle for a stronger and better composed shot.
Golden hour
One of the best times to do landscape photography is during dusk or dawn. The short time interval just before the sun is about to rise or set completely is called the golden hour, and usually last about 15 to 20 minutes.
The sunlight during the golden hour is directional, creating interesting patterns, dimensions and textures while you play with shadows and lightings at the same time. Most importantly, the gold coloured sunlight will give your photo a very beautiful golden hue and evenly lighted landscape.
Deep blue skies
It is really easy to get that deep blue skies which everyone wish to have in their photos. The trick is to shoot your landscape photos with the sun behind you (facing your back). By standing in such way and some adjustment to your camera’s position, chances of getting deep blue sky in your view finder is very high.
That being said, this trick will not work when the sun is directly above your head (usually midday) and you will get nothing but harshly exposed photos.
Also, avoid shooting with the sun facing your camera directly, as it creates a backlit situation and you might see nothing but an entirely black image with a dot of light.
The right settings
It is important to choose the right settings for best result.
For compact cameras and dSLR cameras, the landscape scene mode will come in handy.
In general, the landscape scene mode will have a slightly more saturated colour and bigger contrast to produce a more stunning output.
For those who have manual control or prefer to choose their own preferred setting, choose an aperture value where your images are sharp from corner to corner. Generally, most lenses are at its sharpest at aperture values F8 or F11. With such small aperture, a longer shutter speed is required and a tripod will come in handy.
Also, do set the camera’s ISO level as low as possible for less grainy output.
White balance
Depending on the weather, choose the right white balance (outdoor, sunny/daylight and cloudy) for a more optimised and accurate colour. If you have a grey card or know how to use the custom white balance feature, use it for an even better result.
If you are not confident with your camera’s colours, shoot RAW images so that you can tweak the colours during the post production stage.
These seven tips are the fundamental rules to observe when shooting landscape photos, regardless whether you are using a RM300 compact camera or a RM3,000 dSLR. Following these rules will help you go a long way when it comes to getting great landscape shots.
There are more tips for better landscape photos, such as leading lines, playing with shutter speed, exposure, HDR (high dynamic range) images, reflections, patterns and angle of lights but that’s for another day as they are more advanced and requires more understanding of photography, light and even technical knowledge.
> Jason Lioh is an avid photographer and (used to be) popular blogger. He blogs here and Tweets here. Some of his faourite landscape photos are taken in Malacca and Taiwan.
Leave a reply